Nowadays, we as users want our life made easy and it truly is a tedious process to remember a ton of passwords for various different applications, as a result of which more and more applications are moving towards the trend of using Thirty-Party Single-Sign-on mechanisms. Here what we can accomplish is Okta AWS Integration, where Okta will be integrated as a Third-Party SAML identity provider with Amazon Cognito User Pools, which will be the Service Provider. Okta is an access management tool that helps perform secure user authentication into an application.
Table of Contents
Steps to achieve Okta AWS configuration
We will be integrating Okta with a user pool ( Basically a directory of users, place where all the user information is being stored) in Cognito. First, before starting off with the integration process make sure you have access to both the Okta management dashboard as well as the AWS management console. If you don’t have these accounts then go ahead and create it, after which you can proceed with the below steps.
STEP 1 : Fetch the Cognito user Pool Id and Cognito Domain Name
As a part of Okta AWS Integration, we require the Cognito user Pool Id and Domain Name which we will later integrate in Okta to be able to establish a connection between Okta and the Cognito user pool. Follow the below steps to obtain this information from your Cognito user pool.
AWS Cognito user Pool Id :
Log-in to your AWS management console and go to the Cognito service. Once you are inside the Cognito service select the user Pool with which you want to integrate to okta and navigate to General settings tab by clicking the General settings button on the left navigation bar as shown in the below image. Immediately, upon the click of this, you will see your Pool Id, Pool ARN, and other user pool details related to your pool. We will only require the Pool Id field from here. Make sure to take a note of this value as we will be requiring this later.

AWS Cognito Domain Name :
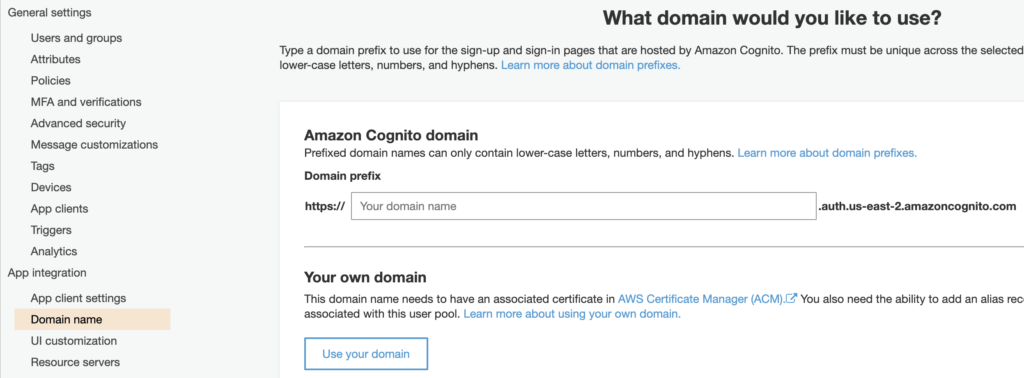
The Domain name can be extracted in the same way we found the user pool Id . In your Cognito user pool navigate to App Integration >> Domain Name. On the right hand side you will see a box appear which will have the value of your Amazon Cognito Domain as shown in the image below. Make a note of the entire Url and append /saml2/idpresponse to the end of the Domain Name URL. This Url will help Okta know where to send the assertions to . In this case assertions from Okta will be sent to the Cognito user pool whose domain name is present in it. The Url should look something like the below one.
https://<yourDomainPrefix>.auth.<region>.amazoncognito.com/saml2/idpresponse
Note: Before we proceed with integrating these details in Okta, we have to know what are the attributes that are required to be able to authenticate a user into the application which is using Cognito as the service provider. These attributes could be email, firstName, lastName, basically anything that you would have configured in your user pool.
STEP 2 : Integrate Okta with the Cognito user pool
Once obtained the Pool Id, Domain Name, and the attributes required to map users. As a part of Okta AWS Integration, we will integrate these details on the Okta end. Follow the below steps to achieve this.
- Login to your okta management dashboard. Navigate to Application >> Applications, click on Add Applications button / Create Applications button.
- Select sign-on method as SAML 2.0.
- Given an appropriate App Name and proceed to the next step.
- Configure the below settings on the SAML page that opens up. Details on how to configure the settings are given in the table below.
- Once configured, click on next.
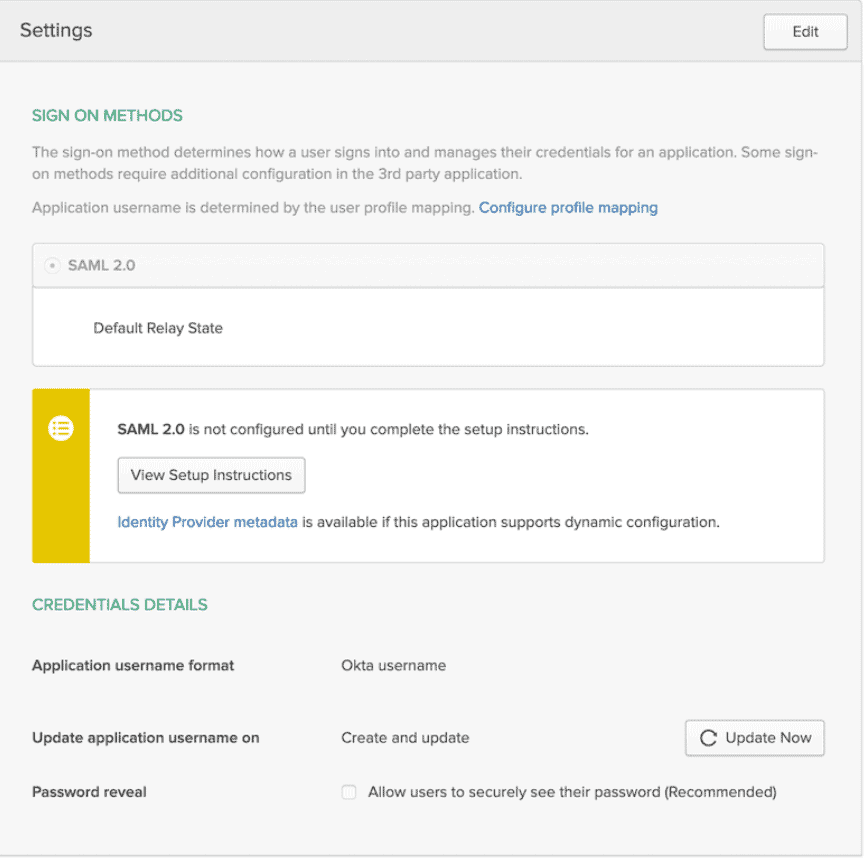
- You will be redirected to the SSO tab as shown in the image below, here click on Identity Provider metadata and copy the URL. This URL will have to be injected in your Cognito User Pool to complete the Integration process. It is equally important to look into the metadata file and check if all the configurations made have been added correctly.

This table shows the settings to be done in Okta in the SAML settings tab as mentioned in step 4.
STEP 3 : Integrate Cognito user pool with Okta
Log in to the AWS Management Console and go to the Cognito user Pool and navigate to Federation >> Identity Providers. Here there will be a place to add the Metadata Url that we obtained in step 2 under the Metadata document section. Give a suitable name to the Identity Provider Metadata under the provider name section and then save the changes. Once saved it should appear under the Active SAML Provider Column.
Next, we will proceed to do the Attribute Mapping’s, to achieve this navigate to Federation >> Attribute Mapping and here add the mapped attributes the same as what was given to Okta in step 2. In the example that I mentioned above in step two we have mapped the schema email address (http://schemas.xmlsoap.org/ws/2005/05/identity/claims/emailaddress) to the user.email of Okta, this means that this specific link contains the email details of the Okta user. To be able to map this user to Cognito and allow him to log in to our Cognito controlled application we have to make sure that we map all the necessary attributes that are required by Cognito to authenticate the user. Ensure that all the attributes have been mapped correctly, if not then the authentication of the user will fail.
Once the attribute mapping is done in the end, let’s enable the okta in Cognito. To do this navigate to App Client Settings on the left navigation bar in Cognito and enable the radio button which will have the Provider name that we gave.
Finally test your connection by clicking on Hosted UI at the bottom of the page.
We have successfully finished our Okta AWS Integration.


